Saturday, August 17, 2013

Baby Birds

So I need to apologize up front for not posting sooner.  I have had this problem with balancing my designing time (while outside in the sun on a blanket with lemonade and an iPod) and having enough time to sew and publish.  My sketch pads are bug marked and grass stained and my legs are finally not white any more.  This allure of being outside is pretty tough to turn down.

Summer is flying by!  I can't believe August is half over.  There have been some big changes in our house that have kept us very busy.  Fiance' J and I are doubling our efforts to get fit and build a sustainable, healthy lifestyle.  We have 379 days until our wedding and are having fun with all our planning and designing!

I have officially left the corporate world and have never been happier.  Thanks to all of you wonderful readers (and Facebook friends and Pinterest followers...) I have been getting quilt orders!  I have sold 2 quilts that were posted here and have taken on another custom order.  Building a business has been a slow but very worthwhile venture.  I am most grateful but please keep the orders coming!   If you have something in mind, let's talk and make it happen!

Alright, enough of the business end.

It was suggested to me that I should post tutorials of techniques or tricks that correspond with current projects.  For my most recent project, I had to make a lot of flying geese blocks.  I am all about conserving fabric, not giving up any waste unless I absolutely have to, and getting the small building blocks done quick enough that I can move on to the more interest parts of piecing.  Enter the 4-from-1 Flying Geese Technique!


4-From-1 Flying Geese

Supplies:
  • 1 large block - this will be the "goose" fabric, size to come
  • 4 small blocks - these will be the sky fabric, size to come
  • Ruler
  • Ball point pen
  • Sewing machine
  • Scissors
  • Iron
  • Magic Formulas:
Large Block = Largest Finished Block Size Measurement + 1 1/4"
Small Block = Smallest Finished Block Size Measurement + 7/8"


My finished block (meaning the space it will take on the quilt top, no seam allowances included) is 2" by 4".  So my large block/blue goose fabric is 4" + 1 1/4" = 5 1/4" square.  My small blocks/white sky fabric are 2" + 7/8" = 2 7/8" square.


Mark your seam lines
The blue line is the center line.  The black lines are the 1/4" seam lines.

Using your ruler and ball point pen, mark the center line from corner to corner on the back of each small sky block.  From this center line, draw another line 1/4" away on both sides.  Those 1/4" lines are your seam lines and are your most important guides. 

Align blocks and sew
Insert shameless flash of my gorgeous engagement ring - love that Fiance J!!
Putting fabrics right sides together (meaning the pretty or top sides of your fabric are facing each other - if you have prints, it is easier to tell as the prints will be facing each other), place two small, sky blocks on your good fabric as shown in the picture.  The corners are squared and even.  There is a small amount of overlap between the two sky blocks.  Be sure that your 1/4" seam lines are in line with each other from block to block.  Nice straight lines!

I am not much of a pinner when it comes to quilt piecing, so please don't be alarmed when you see me skip over that part.  If you want or need to pin, this is when you would do so.

Sew on those 1/4" lines.

Cut down the middle on the center line.

Iron

Add 2nd sky blocks
 Continuing with right sides together, lay one small, sky block on each new unit making sure the corners are lined up evenly.  Just as before, sew down both 1/4" seam lines and...
Cut down the center line.
 And this time, when you iron each unit open, you will have:

4 Beautiful Flying Geese!
 See!  All done!  

It is always a good idea to trim you blocks to the exact size you need for piecing later.  I tend to trim everything before moving on to the next step.  It makes for easier assembly later on and your quilt tops will come out squarer, which either you or your long-arm quilter will DEFINITELY thank you for! :-)

And that's it!  These are our 4 flying geese units, cut from the same block, beautifully ironed and assembled and ready for your next project!  Way to go!!


Or if you don't want to assemble them in any sort of order, then don't!  I'm always a fan of thinking outside the box and away from the traditional form.  With all the flying geese that came from the 4-from-1 method, I made a modern little baby quilt:

"Baby Birds," an original design still under construction.
 Though it is not totally finished, you get the idea! :-)

Thanks for tuning in today and for all your wonderful support!!  Enjoy your weekend and check back soon.  A sneak peek for the next post is just below!

Cheers!!


Coming Attractions...!
Mood: Sun Toasted
Music: "All Nightmare Long" by Metallica

Tuesday, August 6, 2013

Cool breezes remind me of Fall!

This Boston summer has been brutally hot and humid.  But for the past week or so we've enjoyed beautiful breezes and lovely, low humidity!  All us curly haired girls are very happy to have something other than frizz!! :-)

The cool air has got me thinking about the Fall and my favorite color sets!  Burnt oranges, deep reds, olives and navies - just love it!  In the bottom of my stash I found a huge panel of adorable leaf and pumpkin blocks that were just screaming out to be sewn.  I was also lucky enough to find the perfect amount of coordinating fabrics to go with this panel.  And with a bit of a modern twist to it, this is what came from it!

I present "Fall Special," original design by me, M. Rose Arts. (47.5" x 47.5")  A great seasonal accent piece for a living room or bedroom.  It has a touch of Halloween, but not overwhelmingly so that it can still be used through Thanksgiving!  (This would make a great hostess gift to a family member for a holiday dinner if you don't have the time to make that green bean casserole...!)


I am really into this new crisp white and simple modern trend that is happening with quilts lately.  There is a bigger focus on the fabrics and keeping to a simple pattern, letting the colors become the focus.  I am also really a big fan of the no or very little boarder.  Boarders have always been my nemesis.  It's been easy to come up with a central design for the quilt, but coming up with a boarder that isn't cheesey or too busy or takes away from the top in some way is a miserable task.  So this top will be finished off with a simple black binding!

(Fiance' J made the comment, while I was sewing the blocks, that it looks like fancy napkins.  He earned a solid eye-rolling!)


  This panel is from the Blessings II collection, produced by Studio E Fabrics.  Yay for fabric.com - that's where I originally found this great panel!  The other fabrics are things I had hanging around.  The orange is especially fun as it is a mottled with gold metallic.

 Because I love the colors in this so much it was a quick and fun project!  Once this is quilted, I will work on wall hangings and a matching table runner.  The quilt and TBA additionals will be available for purchase.  There will be multiples of everything (quilt, wall hangings and table runners.)  As soon as they are made, pictures will be posted!

Be well and enjoy the gorgeous August weather!

~M

Mood: Relaxed
Music: "Blurred Lines" by Robin Thicke

Sunday, August 4, 2013

Catching up, moving forward, being happy

I had almost completely forgotten about this blog until the other night.  I have been thinking a lot lately about doing more online to get my business up and running, exploring my options...  And when the idea for a website floated across my mind, I remembered this project that I had started 2+ years ago!!

Update: Life is great right now.  I am healthy and have never physically felt better.  J and I are engaged, own our home and have a really good family vibe going.  We both are working - he working private security, me waiting for my security clearance to come through any day now for my new firm and quilting up a storm.  Our furchild, Django, is a delight!  He is 5 months old today and is nearly 60 lbs - Big Pooch :-)

He even smiles when he sleeps!!


I have no clue where the book I had originally decided to use ended up.  It may be in our attic or I may have sent it back to family in New York.  Either way it is out of mind.  From here on in, this will be my sewing blog.  It will mostly be quilting, hoping for some more historical reproduction work shortly and definitely some suiting along the way.  There will definitely be smatterings of other art every so often.  And as always, I am always open to input. 

Lately, I've been very busy and loving every minute of it.  There has been quite the baby boom here in Boston and I have pumped out quite a few baby quilts.


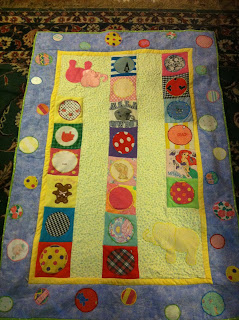
Commissioned piece for cousins in Texas for her first Mother's Day.  All the squares and circles cut from her own baby clothes collected by her mother.  Fusible applique, stippling quilting, flannel backing.

Seattle Star in Kona Solids with feather machine quilting. 1st of 3, this one was sold in a charity (Young Women's Camp) auction 8/3/13.


 Abstract Jungle Flowers in batiks, with fusible appliqued flowers and over all flower quilting pattern.  1st of 2, this one was a baby quilt gift to friends, Aug. 2013.

 From both the Seattle Star and the Abstract Jungle Flower, there are enough for others to be made and can be sold!  Email/message me for details!

 On the side, I've pulled a couple UFO's out of the closet and am finishing them off. 


Unnamed, fusible applique using the Positive/Negative method.  To be quilted - any ideas??


Unnamed, fusible applique using the Positive/Negative method.  I've will be adding boarders and quilting in an overall snowflake pattern.  Updates to come :-)
Also coming soon - owl curtains and quilts, Fall leaves, and Swooning :-)


Mood: Very content
Music: "Hide Your Tears" by Daniel Licht, Dexter Soundtrack