Sunday, December 13, 2015

Christmas Card Ornaments Tutorial

Frohe Weihnachten!  Happy Holidays!  Seasons Greetings!!

2015 has been one busy year!  Sadly, not much quilting but lots of research and fabric work. I am completely in love with the Slow Fabric movement - totally different conversation!

But tonight is all about crafting and making ball ornaments from our old Christmas cards!  This is something that I've been doing for years and have no idea where I learned it from. It is a quick craft and a fun way to keep memories from friends year to year.  I love Christmas cards and hate letting go of them.  But I also don't want to become a hoarder and bury myself in paper.  So these balls have become my happy medium!

This tutorial is a special request from good friends and I happily adopt the name of Human Pinterest! :-)

Supplies:

  • Circular Punch - I used 2.5" size.  You can pick any size you'd like, but I wouldn't go much smaller than 1.5".  You can also draw your own circle template, trace and cut out each circle, but I recommend the punch for each and speed.
  • Equilateral Triangle Template - For my 2.5" circle, my triangle is roughly 2 1/8" on each side.  You can draw your own - each point must touch the outer circle.  (THIS WILL MAKE SENSE BELOW!!)
  • Cards
  •  Adhesive - I love using my hot glue gun or Modge Podge.  Staplers, double sided tape and scrap book grips work but hot glue guns work best. Lasts longer and is hidden from view!
  • Ball Point Pen
To more easily demonstrate, I have used colorful card stock - light blue for the top, green for the bottom and alternating purple and pink for the middle.

Punch out 24 circles - 6 for the top, 6 for the bottom and 12 for the middle.

You can adjust the size of your ornament bigger or smaller - just make sure that the number of middle pieces is double the number of top pieces.

Trace the triangle onto the back of each circle.

Fold each line of the triangle so that the dish-shape has the pen lines on the bottom and outside and your card's picture will be inside the dish.

TOP AND BOTTOM:
(Do the same thing for both Top and Bottom)
(6 Pieces)

Take 2 dish shapes and glue the neighboring flaps together. For the demo, I used scrapbook tape tabs that show up exactly where you want to attach the flaps.  Align the curved edges and the point of the triangle.  The more accurately you can line it up here, the easier later steps will be!

Add a third dish by gluing it to one side of the couple.  Set aside and repeat  with the other 3 Top pieces.


Attach both 3-sets together along the straight edge to create a circular shape.  Set aside. 

MIDDLE:
(12 pieces)

For this, the purple triangles will always point down and the pink will always point up.

Take one purple and one pink and glue together on the neighboring flap. 

Attach a purple piece to the other side of the pink.

THIS IS WHERE IT STARTS TO DIFFER FROM THE TOP!! 

Attach a pink piece to the newest purple piece, ensuring the pink triangle shape is point the up. 

Continue adding pieces in this fashion to create a long  line of triangles, alternating colors and points. 


When all 12 pieces have been added, connect the last pink to the first purple to create a loop.

ATTACHING TOP TO MIDDLE:
This is where your care for matching curves and points comes in super handy!!

The Top (blue) will attach to the purple of the Middle.  The flaps will line up, curve for curve!  It is okay to "man handle" and manipulate a bit to get a good fit.  Glue each flap together.

At this point, if you flip it upside down you will have a bowl and can see your pen marks on the inside!

Repeat for the bottom, attaching the Middle pink to the Bottom (green.)

And there you have it!!  Your Christmas Card Ball is done!!

For some variations, say you have a few extra circle punch-outs left over but not enough for a big ball?  Great! You don't need to make a middle, just make the top and bottom and attach!  These have a cute UFO-ish look to them :-)


Want to make a hanging ornament?  Before you attach Top to Middle to Bottom, thread a ribbon through the center of each and tie it off under the bottom with a knot and pretty bead.  Then glue the layers together.  I'm lazy and don't do this :-)  In stead I collect mine in hurricane glasses with a few fairy lights!

Reach out with questions!  And post your pics in the comments or on my Facebook page, M. Rose Quilt Studios!!  I always love to see what others come up with!

Until next time, cheers and art on!


Mood: Footbally
Music: "Sound of Silence" cover by Disturbed

Thursday, May 28, 2015

Birds, feathers and such!

I'm back!!

I have taken a small break to rework how I use this blog!  Last Fall I was a bit too eager to post works in progress and ended up losing out on business and design.  It was a bitter pill but I've learned my lesson.  Moving forward posts will be of completed quilts that have been watermarked, copyrighted, and/or verifiable that it is my original design.   I love and appreciate my readers and friends and I encourage comments and communications.  But I also need to be more responsible to my talent. 

Alright.  'Nuff said!

Some very exciting things have been happening in the studio this year!

In March I was asked to participate in a celebration of the novel The Giver by speaking about the Psychology of Color and how its used in our media, politics and art.  It was a fantastic experience and I love every minute!  The main event was a book signing and lecture with Lois Lowry herself!  Such an amazing evening getting to meet her and talk quilts with her.  But my personal favorite was having two of my quilts selected as a back drop for her signing!!  (SQUEEE!!)

Me with the GREAT Lois Lowry ~April 30, 2015
As part of my preparation for this event and after reading The Giver about three times over, this little wall hanging came to fruition!   I call it "Fly Away Geese!"  I hope you can see the humor in it! 

What I am most excited to share with you is a piece I just finished yesterday!  I've never worked harder on a piece - or thought more outside the box - than with this piece! 

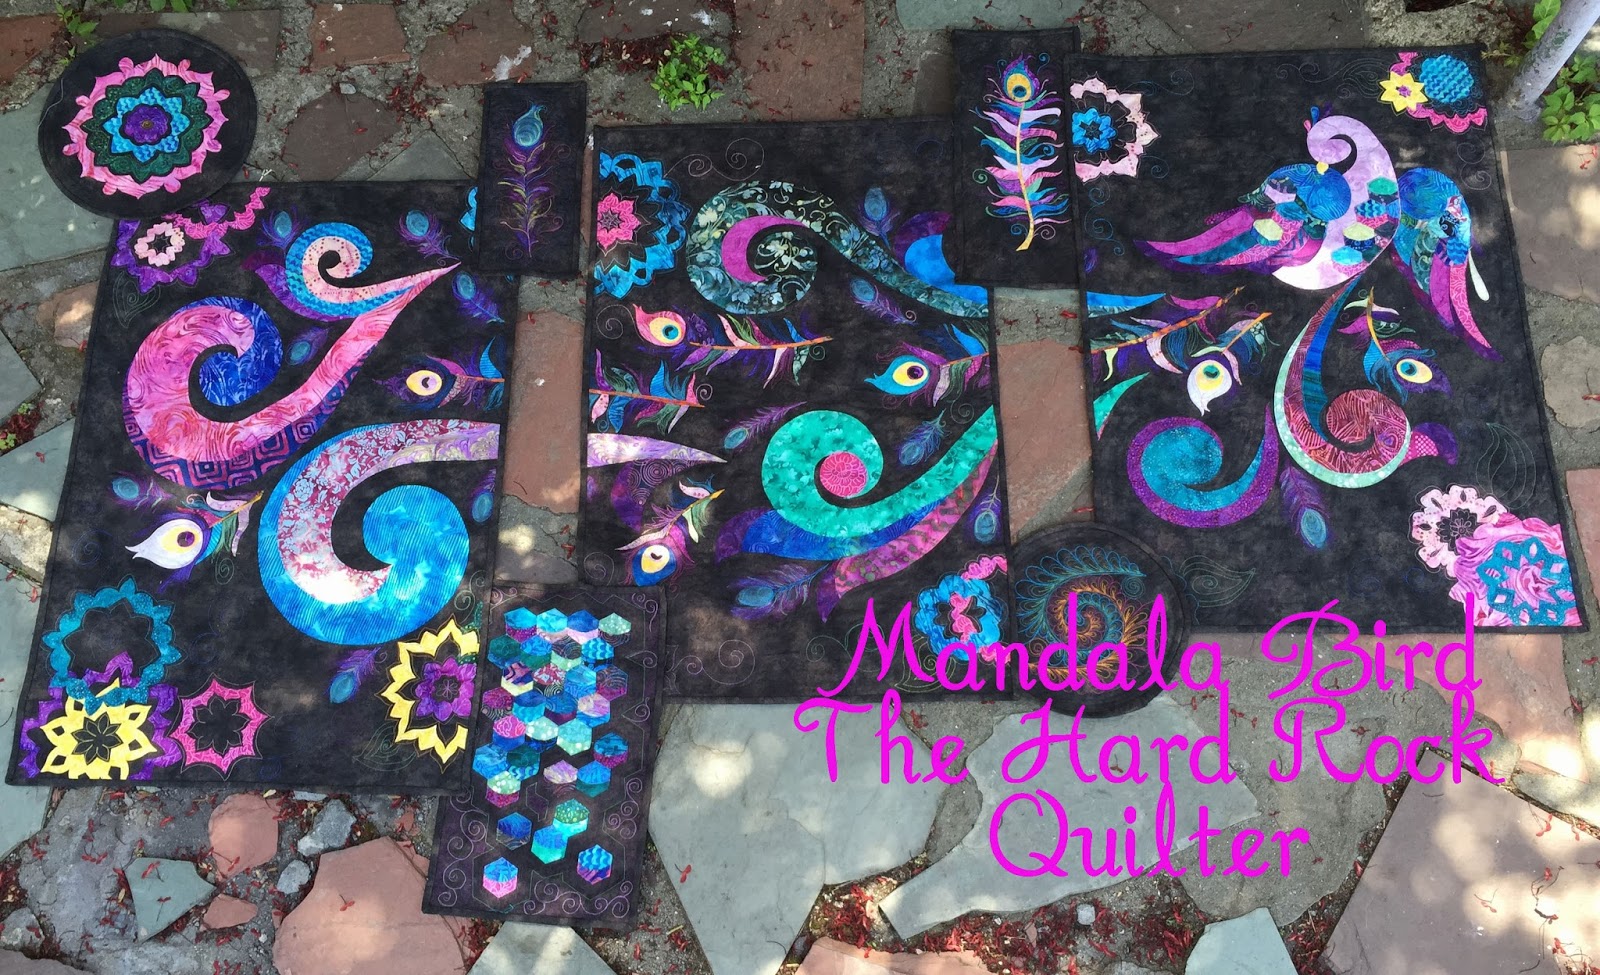
Meet "Mandala Bird" - a quilt collage with so many different techniques!  I can't help my love of birds and peacocks, and also my love for mhendi and henna. This work includes hand piecing, machine piecing, English paper piecing, silk acrylic painting, thread painting, hand quilting, machine quilting, machine applique, hand applique.

Answers to questions I've already received:
Yes, this project is finished!
Yes, the blocks are attached to each other.  There are 2 sleeves on the back - one at the top and one 10" below - to hang it and give it additional support.
This feather is appliqued with thread art.

This block is all thread art.

The hexagons are first curve pieced then English paper pieced together and then hand appliqued to a background.  Finished, the measure 1" wide.
The 2 round blocks are bound, not stitch'n'flip.

The mandala is appliqued with henna style quilting

The wings are pieced with appliqued hexagons on the belly and wings.

The inspiration for the form came from reading Neil Gaimen's Sandman graphic novels.  It's a standard format to have one large panel in the middle broken up by several smaller frames that picture the topics of conversation between characters.  This is exactly what I did.  My peacock is my panel, the smaller frames focus on features of the bird.

My proudest moment - curve pieced hexi's!!  Love them!  I made them to look like the tiny layered feathers of a bird's belly

My favorite block of all - silk painted with thread art over!
I really loved making this piece and hope you enjoy it, too!  I understand it is very non-traditional.  So beyond non-traditional it's kind'a in it's own corner!   So I am open to any questions!

Until then,  Cheers! 

Mood:  Sunny
Music: "Wake Me Up" by Avicii


Sunday, April 5, 2015

SAAM 2015 Quilt - Warrior Heart

Winter is over, warmer temps are here, and there is sunlight later and later into the evening.  Which means my favorite season is blooming all around!  Yay!!

Tonight's post is not my usual post.  It is a bit more intimate and, frankly, uncomfortable than others I've published before.  That being said my intent for posting is not for personal sympathy but for awareness at how commonly this happens and you never know who might be dealing with this.

April is Sexual Assault Awareness Month (SAAM), not that we should need a month to be aware of this topic as it should be common sense that "No means No!"  Sadly, it is an active and vicious abuse world wide.  This is a human to human issue, that puts all gender identities aside and attacks a person at their most precious and vulnerable core.  The scars left behind are brutal, noticeable and life altering.

Labor Day Weekend 2010 I was attacked and assaulted by 3 strangers on the street on my way home from the gym.   Broken bones, scrapes and bruises were the least of the casualties.  For an instant I thought about hiding it from everyone.  I lived in a different city from my parents, my then-boyfriend/now-husband and I were on a break, and I figured I could live it out in my tiny apartment and no one would notice.  I was embarrassed, ashamed, hurting, so-deeply-beyond-sad, angry and so, so confused all at the same time.  I remember I couldn't get comfortable hugging my pillow because my face and ribs hurt so badly.

Thankfully, my mother is a deeply in tune person.  She knew something was up because she couldn't sleep the night before and called me first thing in the morning.   She refused to let me try this ordeal on my own and loved me fiercely.  I spent a month at home surrounded by support, daily/hourly hugs and they got me to the point where I could stand on my own two feet again - enough that I could return to my life in Boston. 

There is no one right way to recover - every single person has different needs in their individual circumstances.  Counseling didn't work for me.  Having to talk about the events out loud somehow made it too real and I couldn't handle that.  I admit that I battled (and to a certain extent now still do...) denial.  And the even bigger D - depression.  My body was forever changed, my personality was forever changed - and all of it was done against my will.  And how that ANGERED me!! 

I by no means mean to give the impression that it was one month and then suddenly I was fine.  Far, far from it.  There are many other long, drawn out details that are mine.  Five years later I can say that it is primarily behind me and does not have a massive influence on my day-to-day.  But I struggle with it.  I'm blessed with persons in my life who support me whole-heartedly as I do.

I know I have mentioned an "accident" or an "incident" in previous posts, where I used quilting as my therapy.  This is that incident.  While I was home, I spent a beautiful day with my Aunt in a quilt shop and going to a local quilt show.  I remember the show was hosted in a church and was one of the most beautiful exhibits I've seen.  So much peace through creativity, being surrounded by it... Wow!

In my mind that is the beginning of my true love affair with quilting!  Even though I've been quilting and sewing since I was 6, I relate to this period as the beginning of my era. 

Which is why this post is so special to me. 

In honor of SAAM 2015 and inspired by the so many other powerful people who have experiences with this evil act, I have made this quilt:

"Warrior Heart," April 2015, 35" by 45", applique with hand stitched details
Details of the heart

I do not pretend to speak for anyone else or how they classify themselves.  Victim, victor, casualty, survivor, warrior - it is entirely a personal experience and only you can say.  This is me.  This is my declaration to the world that I am not ashamed any longer of something so far out of my control happened to me.  My (emotional) (psychological) scars still zing in sharp and unexpected ways.  I think they always will.  But I can hold my head high and say to those 3 cowards (still on the loose - and if you happen to be reading this, Shame on you!) "You Did Not Win!"

For anyone reading this that is hurt and needing help, please reach out!  There are trained people ready and so willing to listen and help you!  Rape, Abuse, Incest National Network (https://www.rainn.org/) is a great place to start. 

If you are looking for a cause to support, Red My Lips (http://redmylips.org/) is one that I subscribe to.  And for them I will be wearing bright red lipstick for the month of April!

Love to you all; and thank you for reading this!  Please spread the word - there might be that one person suffering all alone and we can make the difference!

Mood: Determined
Music:  "Freedom" from the Django Unchained Soundtrack

Sunday, October 5, 2014

Watercolor Poppies

(I know I always start out with some comment about the weather and I'm gonna do it again!) 

Today was Autumn perfection!  Sunny, crisp and cool - you couldn't have asked for anything better.   It's days like this that really make me love nature and appreciate all the beauty around us.

This photo was sent to me this morning from a friend, just north of Boston.  Absolutely gorgeous!!

So much so that I had to bring it in to the Studio tonight. 

Carrying on after yesterday's experiments... Remember those random red and orange blobs done with the silk acrylics?


Well they are now poppies!  My inspiration for these comes from the new style of watercolor/impressionist tattoos that feature geometric, avant garde subject matter.  There are bold splashes of color that don't necessarily "stay in the lines" when colored, if colored at all.  I absolutely love this style - be prepared to see more like it!
Roughly 15" tall

Tonight, the first step was to heat set with a dry iron at a very high heat.  I used a tefflon ironing sheet to prevent any extra paint from catching on my iron, but it didn't appear to have any bleeding. 

Next an outline in black.

Then added detail in complimentary colors. 


I had a lot of fun with this and am happy with the out come.  This was only an experiment so I don't think I'll finish quilting the back ground - but then again, I may change my mind in a few days :-) 

Coming up is a marathon week for my office but I will try my best to get the next experiment done and up!  I'm too excited to let it sit for too long...!

Enjoy the Fall and we'll chat soon! Cheers

Mood: Pleased!
Music: "Rasputin" by the Town Pants

Saturday, October 4, 2014

Painting the Rain Away...

The Hubs and I have been insanely busy with home updates.  Boston is not exactly known for gentle winters and our poor little chalet needed some TLC to make it through a bit tighter and warmer than last year!  And the more we do, the prouder I get of our abode.


We had to say "Good-bye" to our 6 trees in the back yard.  Sadly they were starting to grow into our house and back porch foundation, while damaging our roof.  On the plus side, it has opened up so much day light into the house!! 

Brand new door and front steps!! 

And a window that looks like a quilt block??  Oh yes, this will be done!
Every new door deserves a new decoration, right?  A quickie project with wood letters, ribbon and paint!

During the week I work a few days at a bio-imaging lab and watch all the lab techs, in their cool white coats run all sorts of experiments.  In my over imaginative brain, I picture them doing something involving beakers and funky chemicals that create a lava-bubbling in bright purples and pinks.  Or at the very least a beautiful smell.  Reality is far from that, I'm sure.

But today I got to play "scientist" at home!  I'm very excited by a new found product put out by Luminarte.  These little guys are silk acrylic paints and are a lot of fun.  You can use them on wood, pottery, fabric, pretty much whatever you care to try.  In this case - muslin.

The link in Luminate will take you to Amazon, where you can find so many different colors available!

Today was experimenting how to get different effects on fabric.  I tried water, hydrogen peroxide and alcohol; tested the effects of pigment first then eye drop liquid on top vs. wetting the muslin and adding pigment.  I loved watching the dyes spread and change color the further out they went, really neat effects!

In total, each large "splotch" took about 5 minutes to full spread out, and that was with a very wet canvas.  My favorite effect so far is the alcohol on the brown pigment as it turns a blue green then yellow the further out it spreads.


Blending was also fun and very easy!  It essentially turned into water-coloring on fabric.  These are just the beginnings.  Once these dry and are heat set (in about 24 hours) we'll see what they turn into under the needle!!  (Sounds so sinister, doesn't it?!) 

More will definitely be coming!!


Be sure to have a drop cloth or some sort of backing that you're not afraid of damaging as these do bleed through.


I hope you all have some fantastic Autumn projects under way!  Come share them over on the M. Rose Quilt Studios Facebook page (link above!)  Let's see what everyone is up to!

Cheers!

Mood: Curious
Music: "Learn to Fly" by the Foo Fighters