2015 has been one busy year! Sadly, not much quilting but lots of research and fabric work. I am completely in love with the Slow Fabric movement - totally different conversation!
But tonight is all about crafting and making ball ornaments from our old Christmas cards! This is something that I've been doing for years and have no idea where I learned it from. It is a quick craft and a fun way to keep memories from friends year to year. I love Christmas cards and hate letting go of them. But I also don't want to become a hoarder and bury myself in paper. So these balls have become my happy medium!
This tutorial is a special request from good friends and I happily adopt the name of Human Pinterest! :-)
Supplies:
- Circular Punch - I used 2.5" size. You can pick any size you'd like, but I wouldn't go much smaller than 1.5". You can also draw your own circle template, trace and cut out each circle, but I recommend the punch for each and speed.
- Equilateral Triangle Template - For my 2.5" circle, my triangle is roughly 2 1/8" on each side. You can draw your own - each point must touch the outer circle. (THIS WILL MAKE SENSE BELOW!!)
- Cards
- Adhesive - I love using my hot glue gun or Modge Podge. Staplers, double sided tape and scrap book grips work but hot glue guns work best. Lasts longer and is hidden from view!
- Ball Point Pen
Punch out 24 circles - 6 for the top, 6 for the bottom and 12 for the middle.
You can adjust the size of your ornament bigger or smaller - just make sure that the number of middle pieces is double the number of top pieces.
Trace the triangle onto the back of each circle.
Fold each line of the triangle so that the dish-shape has the pen lines on the bottom and outside and your card's picture will be inside the dish.
TOP AND BOTTOM:
(Do the same thing for both Top and Bottom)
(6 Pieces)
Take 2 dish shapes and glue the neighboring flaps together. For the demo, I used scrapbook tape tabs that show up exactly where you want to attach the flaps. Align the curved edges and the point of the triangle. The more accurately you can line it up here, the easier later steps will be!
Add a third dish by gluing it to one side of the couple. Set aside and repeat with the other 3 Top pieces.
Attach both 3-sets together along the straight edge to create a circular shape. Set aside.
MIDDLE:
(12 pieces)
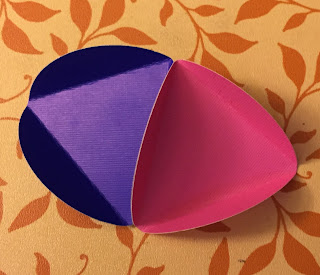
For this, the purple triangles will always point down and the pink will always point up.
Take one purple and one pink and glue together on the neighboring flap.
Attach a purple piece to the other side of the pink.
THIS IS WHERE IT STARTS TO DIFFER FROM THE TOP!!
Attach a pink piece to the newest purple piece, ensuring the pink triangle shape is point the up.
Continue adding pieces in this fashion to create a long line of triangles, alternating colors and points.
When all 12 pieces have been added, connect the last pink to the first purple to create a loop.
ATTACHING TOP TO MIDDLE:
This is where your care for matching curves and points comes in super handy!!
The Top (blue) will attach to the purple of the Middle. The flaps will line up, curve for curve! It is okay to "man handle" and manipulate a bit to get a good fit. Glue each flap together.
At this point, if you flip it upside down you will have a bowl and can see your pen marks on the inside!
Repeat for the bottom, attaching the Middle pink to the Bottom (green.)
And there you have it!! Your Christmas Card Ball is done!!
For some variations, say you have a few extra circle punch-outs left over but not enough for a big ball? Great! You don't need to make a middle, just make the top and bottom and attach! These have a cute UFO-ish look to them :-)
Want to make a hanging ornament? Before you attach Top to Middle to Bottom, thread a ribbon through the center of each and tie it off under the bottom with a knot and pretty bead. Then glue the layers together. I'm lazy and don't do this :-) In stead I collect mine in hurricane glasses with a few fairy lights!
Reach out with questions! And post your pics in the comments or on my Facebook page, M. Rose Quilt Studios!! I always love to see what others come up with!
Until next time, cheers and art on!
Mood: Footbally
Music: "Sound of Silence" cover by Disturbed


